JTAG debugging for the LS1088A
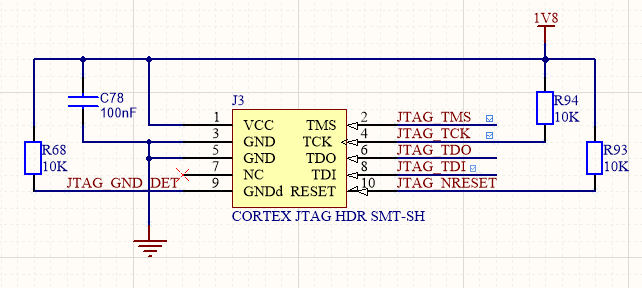
The Ten64 board has a standard 10-pin, 1.27mm pitch ARM Cortex JTAG debug header, operating at 1.8V. Protocol is standard JTAG (not SWD).
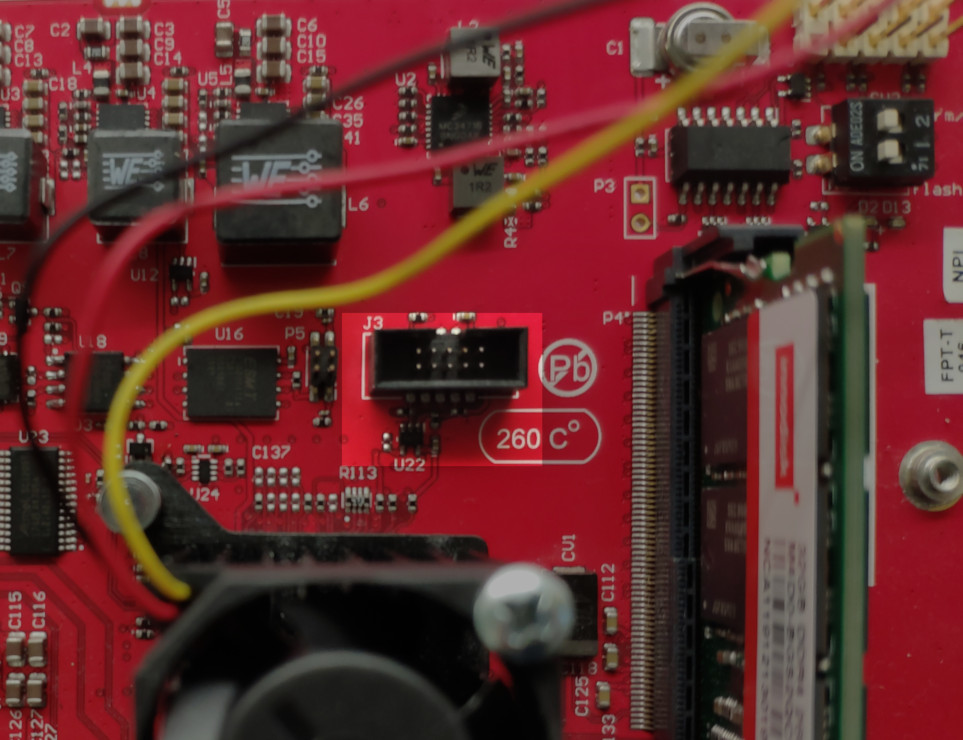
The LS1088 JTAG header is J3, near the SoC on the top of the board. There are no other devices in the chain.
The best toolset for low level debugging is NXP's CodeWarrior for Network Applications and the CodeWarrior TAP as CodeWarrior has scripts that can take the SoC out of reset without a bootloader running. CodeWarrior, however, is very pricey (US$3000-5000 annually depending on options) so we also support community tools.
OpenOCD can be used to do post-boot debugging for Trusted Firmware, U-Boot and Linux.
OpenOCD
Get the Configuration here - https://gitlab.com/snippets/1908304
This configuration has been tested with the Dangerous Prototypes BusBlaster v3. You will need an adaptor to convert the 2.54mm pitch connector on the BusBlaster to 1.27mm pitch, such as the Olimex ARM-JTAG-20-10.
Remember to use the "Target Power" option on your adaptor (e.g on the BusBlaster, leave the jumper off).
Note
Reminder: The LS1088 JTAG runs at 1.8V. If you use another voltage you will damage your board!
General tips
Getting breakpoints to work early in the boot process (in TF or U-Boot) can be difficult. The best way around this is to add a long pause/sleep before the code you are trying to debug - then halt the CPU - for example, in before the handoff to U-Boot in ATF.
Tutorial - debugging U-Boot with OpenOCD and gdb
You will need:
-
An arm64 gdb - if you are not already on a native arm64 host you might find packages in your distribution or you could use the Linaro toolchain.
-
OpenOCD with support for your target probe
For the BusBlaster you can start OpenOCD with:
.\bin\openocd.exe -f "interface\ftdi\dp_busblaster.cfg" -f .\ls1088a_test.cfg
- A compiled u-boot ELF binary (as in
u-boot/u-boot) - this is not the same binary that is packaged into Trusted Firmware/BL33 (u-bootnormally weighs just under 10MiB,u-boot.binis around 1.2MiB)
U-Boot debugging is a bit tricky as U-Boot relocates itself after loading - so GDB needs to be told of the relocated offset.
If your board is running, you can use the bdinfo command to get the reloc address:
=> bdinfo
arch_number = 0x0000000000000000
...
TLB addr    = 0x00000000fbdf0000
relocaddr   = 0x00000000fbcd4000
...
You can also discover it from GDB on a running target:
print/x ((gd_t *)$x18)->relocaddr
$1 = 0xfbcd4000
Explanation: x18 is the register where a pointer to U-Boot's global data struct is stored, the relocaddr parameter is inside the global data struct - see the Debugging U-Boot article on denx.de for more information.
and then tell GDB to recognize 0xfbcd6000 as the U-Boot address and load symbols:
symbol-file # to clear the previous symbol definitions
add-symbol-file u-boot 0xfbcd4000
To debug U-Boot before it reaches the command line, you need to use a hardware breakpoint to break the U-Boot entry point (also known as CONFIG_SYS_TEXT_BASE, typically 0x82000000):
- Reset the board
- Immediately start OpenOCD
- On your gdb console, enter:
target extended-remote localhost:3333; thbreak *0x82000000
It might be helpful to add a delay somewhere in Trusted Firmware (before the handover) to give more time to setup the debugger - see this snippet for one possible method.
Reference
- U-Boot - How to debug - this is for a 32-bit ARM processor but the basic steps are the same.