Virtual Router Application Note
This application note describes a 'typical' uCPE setup for business situations, using a router VM with multiple logical networks on both wired and wireless segments.
We use IPFire as the router VM, and μVirt as the VM host, but the techniques and methods presented here are applicable to other virtual routers and hosts as well.
Proposed setup

IPFire supports four network zones which we set up bridges for in μVirt:
- Green - LAN/"Office" network. This will also be presented as a tagged VLAN (VLAN10) to WiFI APs.
- Orange - DMZ (Demilitarized zone) - for any public-facing servers
- Blue - WiFi Guest network.
Configuration Steps
Step 1: Install μVirt
See the μVirt page in this manual and the homepage for installation instructions.
Step 2: Configure network bridges
By default, there will be a "LAN" network across eth0-eth3 + eth5 and eth6 tagged and "WAN" for eth6 - we need to remove the eth1-eth5 ports and put them into their respective bridges.
- In LuCI, untick "Bridge Interfaces" for the LAN network - this will collapse it down to eth0 only.
- In UCI you can do:
uci delete network.lan.type
uci set network.lan.ifname="eth0"
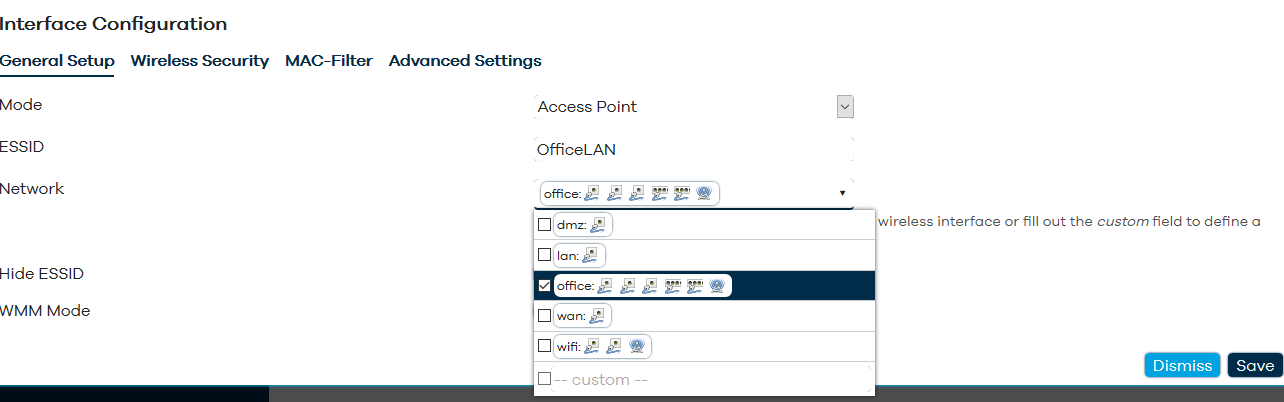
Then create an empty bridge for the office/green network.
As OpenWrt is not doing the routing, you need to set the interface type to 'unmanaged'.
For the two WiFI AP interfaces, you need to manually enter them in the dropdown as <interface>.vlan, such as eth5.10 and eth7.10.
It is also a good idea to enable spanning tree protocol (STP) for all the network bridges.
And similarly for orange (DMZ) and blue (WiFI).
WAN interface setup
Turn the WAN interface into a bridge by enabling the "Bridge Interfaces" option in the Physical settings tab.
You should also switch the default 'WAN' interface to unmanaged mode and delete wan6 - however - you might want to do this after you have completed the download of the IPFire VM below.
The final result will look like this:
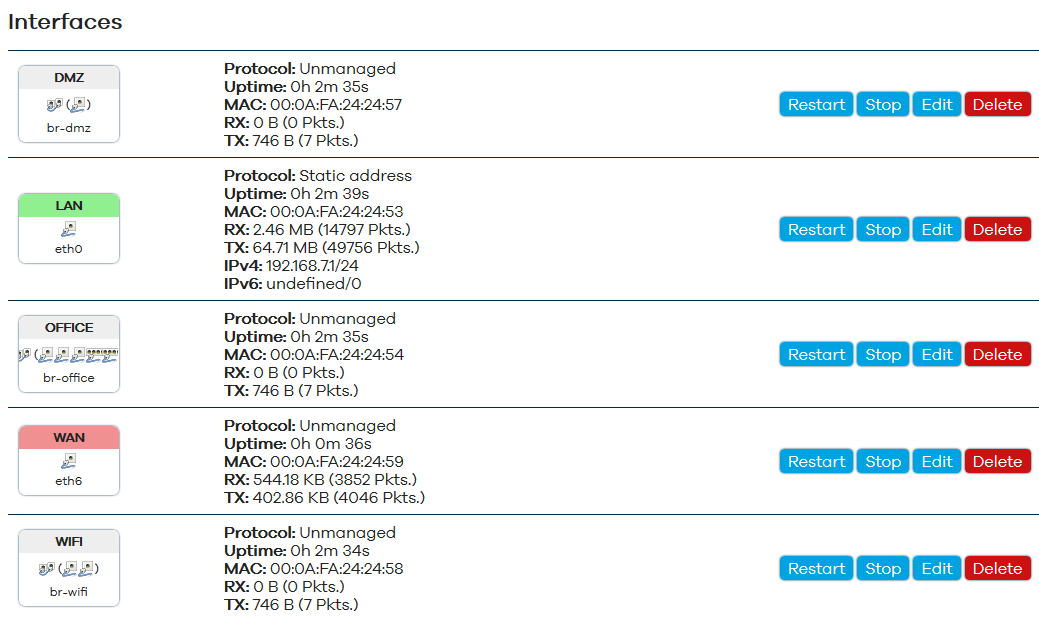
Or in the UCI config:
# cat /etc/config/network
# ... (loopback and ula settings)

config interface 'lan'
        option proto 'static'
        option ipaddr '192.168.7.1'
        option netmask '255.255.255.0'
        option ifname 'eth0'

config interface 'wan'
        option ifname 'eth6'
        option proto 'none'

config interface 'office'
        option proto 'none'
        option type 'bridge'
        option ifname 'eth1 eth2 eth3 eth5.10 eth7.10'
        option stp '1'

config interface 'dmz'
        option proto 'none'
        option type 'bridge'
        option ifname 'eth4'
        option stp '1'

config interface 'wifi'
        option proto 'none'
        option type 'bridge'
        option ifname 'eth5 eth7'
        option stp '1'
Step 3: Configure and Install IPFire VM
There are a couple of options you need to pay attention to:
- Enable this VM
- Networks: add all the available bridges (office, dmz, wifi and wan).
- Provisioning: take the link and checksum of the aarch64 "flash image" from the IPFire release download page. You will need to specify the format as "raw-xz".
The order in which they are in the configuration does not matter - but keep note, as they will appear in the IPFire VM in the order they are listed.
The IPFire install process is pretty much the standard one as described in the IPFire Documentation.
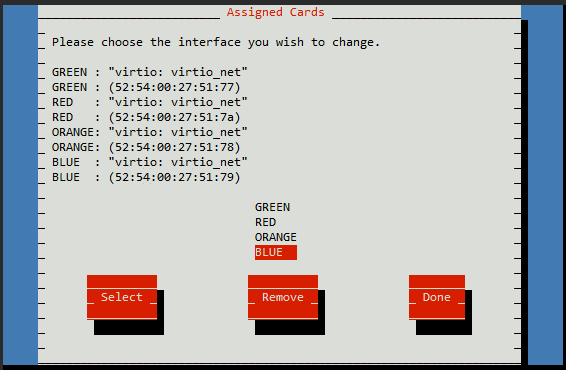
Take note that you set the correct zonal configuration:

As noted earlier, make sure the order of the interface assignments matches the order they are specified in the VM configuration - the first one will have the 'base' MAC address.
Enabling management access from the office LAN
Besides the dedicated management interface (eth0), it might also be desirable to access the uCPE host from the office network.
If the router VM is also the only one with internet access then you can also configure the VM host to access the internet via the router VM.
You can do this by changing the protocol on the office bridge from 'unmanaged' to 'static' or 'dhcp', and by assigning the 'office' interface to the 'WAN' zone.
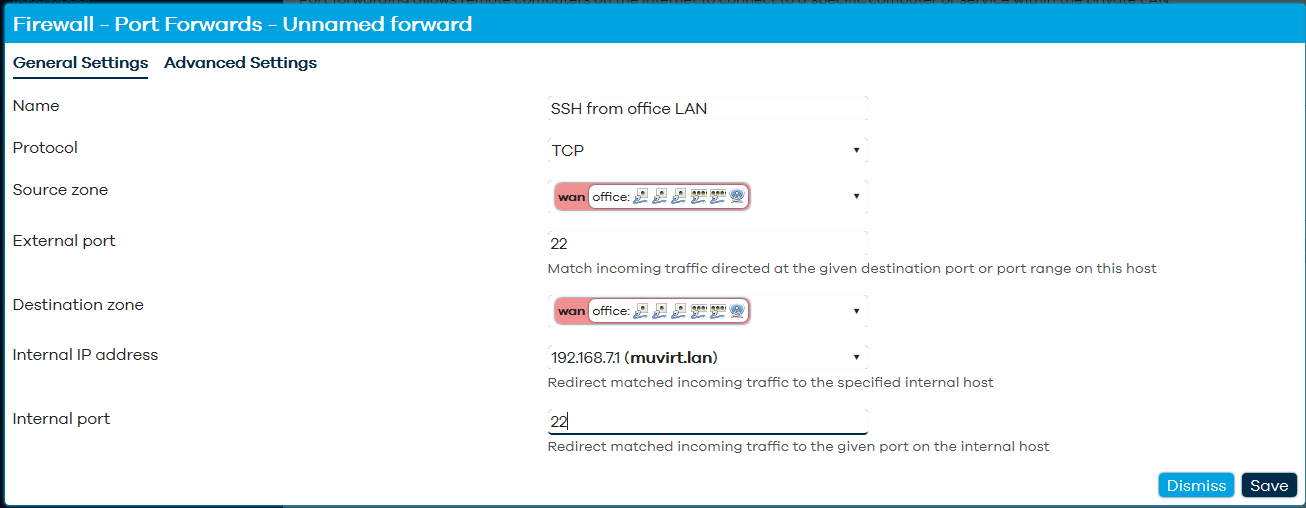
To access SSH and Web/HTTPS from the office network, you will need to add two port forwards;
You will need to set the source zone as 'WAN' and the internal IP address as the VM host itself, along side protocol, external port and internal port.
Configuration variant: Wireless cards instead of external WiFi APs
For smaller locations which don't need multiple WiFi APs, using wireless cards installed inside the Ten64 are a good solution.
The good news is this is very easy to set up (including having multiple SSIDs) - go to the 'Wireless' page under 'Network' and specify your office / wifi bridge as the network for the SSID.